
Defining Your Brows: Where Should Your Eyebrows Start?

Eyebrows are one of the most defining features of the face, framing the eyes and serving as one of the most noticeable aspects of your appearance.
Having perfectly maintained brows make a world of difference in your everyday look, and not only make you look brighter and more open, but can even serve to flatter your existing features and face shape.
If you’re wondering how to achieve the perfect brow, use this guide to learn the basics of eyebrow shaping and waxing to achieve the brows you envy.
Table of Contents
READ: How to Choose an Eyebrow Waxing Kit
Understanding Eye Shapes
When looking to shape your eyebrows, it can be hard to know where to start. Finding the right eyebrow shape lets you flatter your face and ensures your brows are in harmony with your features.

The right eyebrow shape for your face depends on your eye shape. The following are some rules of thumb to use when identifying your eye shape and how to shape your brows for each type:
-
Almond Eyes:
This eye shape resembles an almond, with a visible crease in the eyelid and a slightly upturned outer corner. Though this eye shape can pull off various brow styles, a brow with a soft angle can enhance natural symmetry.
-
Round Eyes:
Characterized by noticeable roundness and a lock of visible outer corners, these eyes appear large and open. Incorporating a brow shape with a high arch can help open the face up further and add length to your lid. Avoid overly rounded brows, as this can over-accentuate your eye shape and throw off your facial balance. .
-
Hooded Eyes:
Hooded eyes have a layer of skin that droops over the eye crease, which makes the lid look smaller. Using a brow shape with a slight arch and thinner ends can help create a lifting effect to open the eyes up more.
-
Monolid Eyes:
These eyes lack a visible crease and have a smooth, flat eyelid. Straighter brows with a gentle arch can flatter and add extra definition to these eye shapes.
-
Downturned Eyes: Downturned eyes are characterized by downturned outer corners. A contrasting lifted brow with an arch can complement this eye shape and open the eyes more.
- Upturned Eyes: Upturned eyes have outer corners that tilt upward, which can create a cat-eye effect. To balance this natural lift, a brow with a soft arch can balance this shape. Avoid overly high arches that can make the eyes appear further upturned.
- Deep-Set Eyes: Set deeper into the face, these eyes have a more prominent brow bone. A fuller brow with a gentle arch can help balance these features and bring the eyes forward.
Crafting your brows to balance and complement your natural facial features and eye shape will let you frame your face and leave you feeling your best.
READ: Eyebrow Waxing vs. Threading: Complete Guide for Beginners
Eyebrow Shaping Tips
Now that you understand eye shapes and which eyebrow shapes might best complement them, let’s talk about how to achieve these brow shapes.

Proper eyebrow mapping is essential to crafting and achieving your perfect brow shape. Using your existing bone structure can help map out your brow properly. The following tips can help you map out your most flattering brows, regardless of which shape you’re going for:
Use the Right Lighting
Use the best possible lighting to map your brows out. Use natural light whenever possible to avoid awkward shadows that could throw off your natural proportions. Always use a regular mirror when mapping your brows—no magnifying mirrors!
Brow Mapping Basics
When outlining your brows, knowing your facial symmetry is essential to keeping your brows looking their best.
- Where to Start Your Brows: Use your nose as a guide when choosing the start point of your brows. Your brows should start above the middle of each nostril—use your pencil to line these up.
- Where to Arch Your Brows: Getting the shape of your arch (whether strong or soft) is important to define your brow shape properly. The highest point of your arch should connect diagonally through the middle of your iris to the middle of your nose tip.
- Where to End Your Brows: End your eyebrow shape where your eye’s outermost corner aligns diagonally with your nose’s corner.
Preparing for Waxing Brows
Trim your brows prior to waxing if you have hairs that are particularly long or would get in the way of the path you need to wax. Start by combing the hair upwards and outwards before using small brow scissors to trim the ends of long hairs that might extend into or past the shape you’ve outlined. This will make applying your wax easier and reduce the chance of removing hairs by mistake.

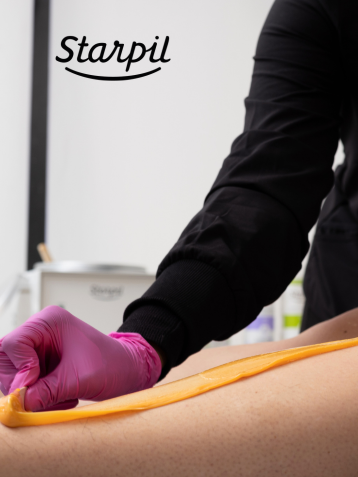
After your brows are fully mapped and outlined and you’re happy with the shape you’ve created, it’s time to get waxing! But wait—which wax should you use for eyebrows?
READ: Why Learning About Eye Shapes Improves Your Eyebrow Game
Which Wax is Best for Eyebrows?
When waxing your eyebrows, it’s important to find the right wax for removal. Take into account your skin sensitivities, skill level, and which wax type you might gravitate toward or have experience with.

If you’re not sure the difference between wax types or where to start in choosing the right one for you, let us guide you through the ins and outs of how to choose the right eyebrow wax.
How to Choose the Right Eyebrow Wax Kit
For eyebrow waxing, you’ll need a wax warmer, wax, wax spatulas, pre & post-wax care, tweezers, brow scissors, and a brow pencil. You might already have items like tweezers or brow pencils at home.
For those who want everything you need for waxing in one convenient place, getting an eyebrow waxing kit is an easy solution. Consider the following kits for your brow waxes:
Facial Waxing Kit
Starpil’s Facial Wax Warmer Kit includes our Digital Mini Facial Wax Warmer, a 500g bag of our Blue, Pink, or Black Film Hard Wax, spatulas, and pre & post-wax care products. Just as its name implies, this kit is ideal for all things brow and facial waxing.

If you want to do more than just brow waxing, the Standard Hard Wax Kit is exactly what you need. This kit includes our Standard Hard Wax Warmer, which holds up to 1lb of hard wax, compared to the 8.2oz capacity of the Facial Wax Warmer.

Along with a 500g bag of the Film Hard Wax of your choice plus spatulas and pre & post-wax care, this kit takes facial waxing to the next level.
READ: How to Wax Eyebrows: The Step by Step Guide
Eyebrow Waxing Mistakes to Avoid
Waxing your brows can be a delicate process that requires a lot of attention to detail to perfect. Remember, practice makes perfect!
When waxing, avoid the following common mistakes to make sure your brows are at your best.

- Less is More: Especially for beginners, it’s better to remove less hair at first when you’re starting off. You can always go back in and perfect your shape or take off more hair, but you don’t want to overdo it and end up with messed up brows.
- Overwaxing: As we mentioned, overdoing your wax can leave you with a brow shape you didn’t want or uneven or thin brows.
- Slow and Steady: Don’t rush, especially if it’s your first time waxing your own brows or your first time waxing in general. Rushing can lead to messy application, inaccurate angles, and just not the best results. Give yourself time!
- Incorrect Wax Temperature: Wax that’s too hot can burn your skin, while wax that’s too cold won’t adhere properly. Always test the temperature before applying.
- Retinols: If you think you use skincare products that don’t mesh well with waxing, it’s better to be safe than sorry. For example, if you use retinol, you should avoid facial waxing entirely. Retinoids thin facial skin, which can lead to skin lifting or tearing when waxing.
- Skipping Pre & Post-Wax Care: One of the biggest waxing mistakes you can make is skipping the pre & post wax care process. Always exfoliate the night before or morning of, and cleanse your skin using Starpil Pre-Wax Gel prior to waxing. After waxing, use Starpil Post-Wax Lotion and Starpil Post-Wax Oil to soothe and hydrate the skin.
READ: Why Using Pre & Post Wax Products is a Must
Final Thoughts
Overall, defining your brows revolves around finding the right brow shape for your eyes, mapping your brows correctly, and finding the right eyebrow waxing kit for your needs.
When it comes to waxing your brows, always remember to take your time and not rush yourself. Less is more, and practice makes perfect. Soon, you’ll be a brow expert in no time.

Comentarios